Creating a Python Linked List Step by Step

Categories:
 Written by:
Nathan Rosidi
Build a stack using a Python linked list, understand the logic, memory flow, and interview-ready reasoning behind it.
Linked lists are one of the core constructs you'll discover in Computer Science. Yet, most Python developers never create one from scratch. In almost every case, people use Python built-in lists, and in nearly every case, a Python list will suffice.
However, what if an interviewer asks you to build a stack using a linked list, instead of a list?
In this article, we'll explore that valuable piece of information: how it works, when to use it for an interview question, how to implement list functionalities, common mistakes, and, oh, by the way, what's next after learning linked lists.
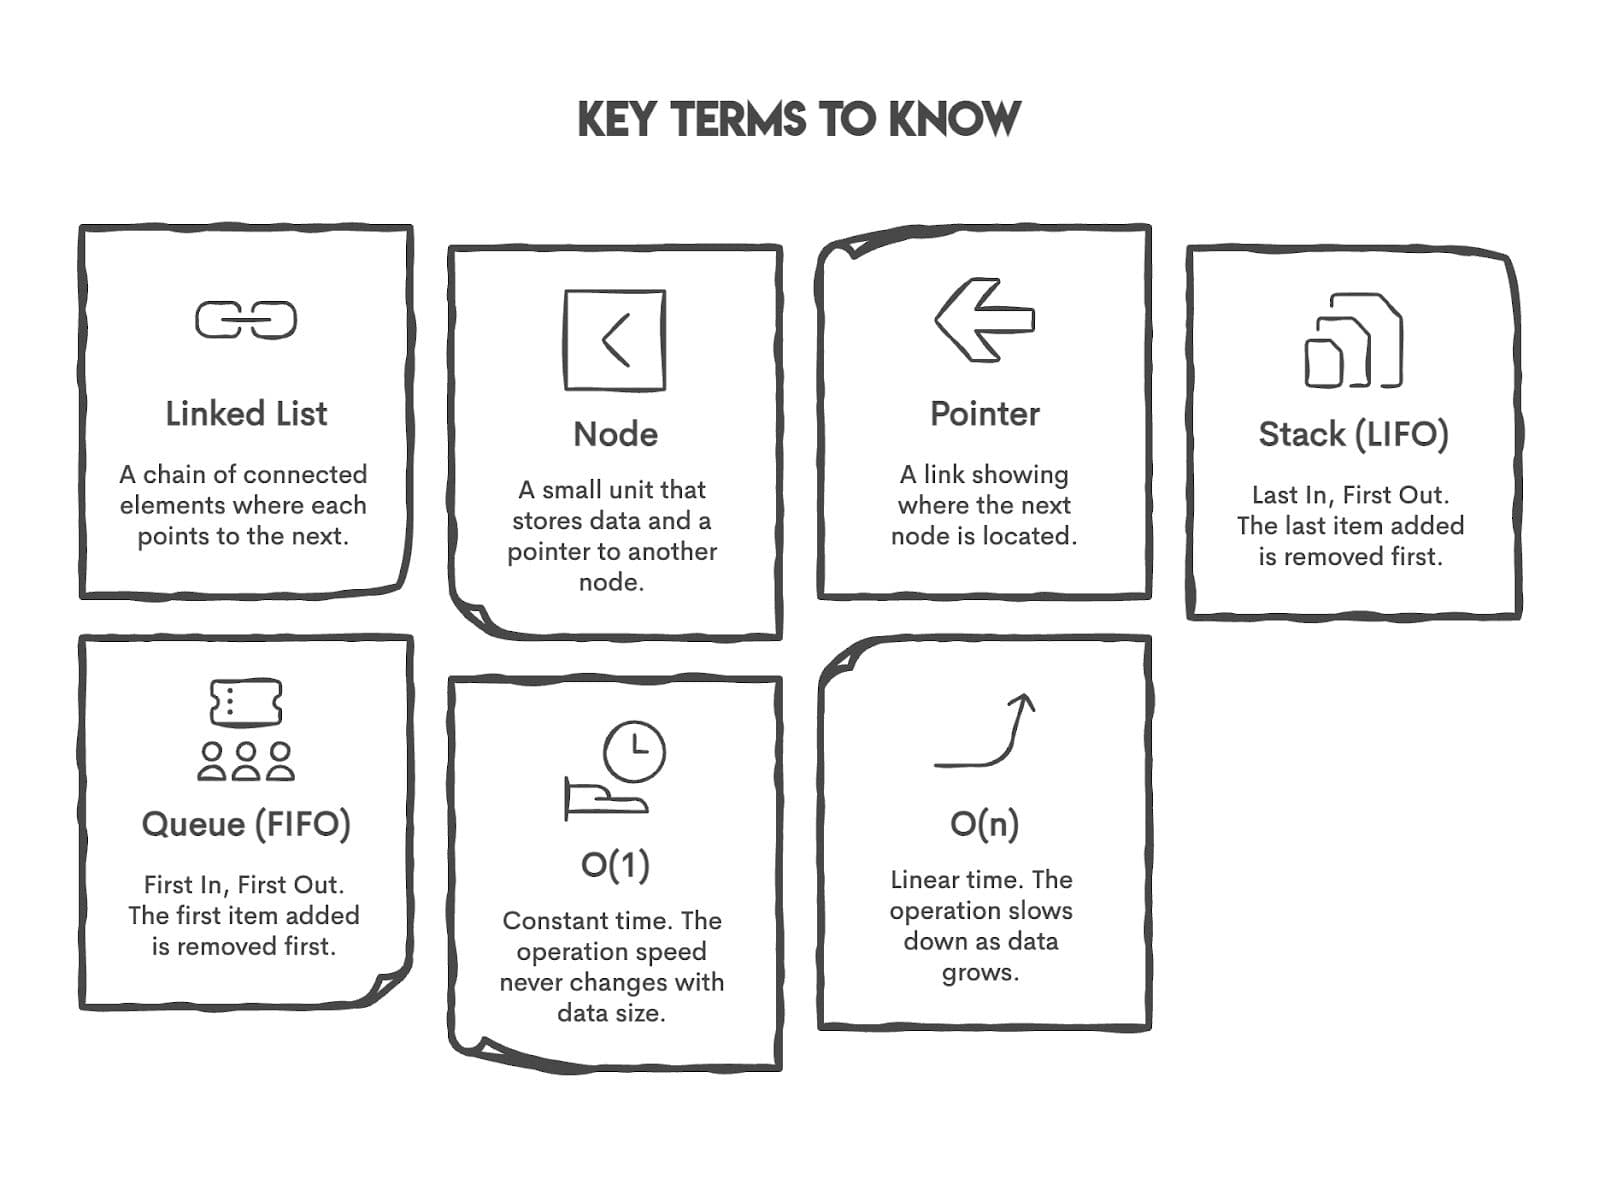
Before You Begin: Key Concepts to Know
Before you begin, let me introduce you to the key terms you have to know to understand this article better.
What You’ll Build, Why It Matters, and What You’ll Need
Let’s discover what we’ll build, why it matters, and what you’ll need to do it.
What will you build?
- We will build a stack data structure by using a linked list. To do that, we'll implement push, pop, and peek operations. The result? A working stack that processes operations dynamically.
Why does it matter?
- Linked lists show how memory works behind the scenes. Once you understand how nodes and pointers connect, you start to see performance from a deeper angle. Interviewers like this topic because it shows if you can turn abstract ideas into simple, working code.
What will you need?
- Basic Python knowledge (classes, methods, conditionals)
- A clear understanding of what a stack does (LIFO: Last In, First Out)
- 20 minutes of focused practice
No external libraries. No shortcuts. Just Python and logic.
Python Linked List Fundamentals
A linked list is a chain of connected nodes. Each node has two parts:
- The data you want
- A pointer to the next node
The last node points to None. It means the chain ends there.
It is a bit like pursuing a treasure hunt. Each clue gives you information and shows you where to go. When there is no clue left, the hunt is over.
Here's the anatomy:
class Node:
    def __init__(self, data):
        self.data = data
        self.next = None
This is your building block. Every node knows its value and where to go next.
Why not just use a Python list?
After all, Python lists are arrays at some level. They reserve contiguous memory, which allows quick access in `(O(1))` time. However, inserting or deleting at the beginning is slower `(O(n))` because every element must be shifted.
A linked list flips this. You can insert at the head of a linked list in `(O(1))` time, but when you want the 10th element, you need to walk 10 nodes, resulting in `(O(n))` time.
Key takeaway
Linked lists provide dramatic advantages when you want to insert and delete items consistently at the beginning of the list. Linked lists can become cumbersome, especially when you cannot access them through random access. This is why they are seen in stacks (LIFO) and queues (FIFO).
Real Interview Scenario: The Amazon Stack Challenge
Linked List Stack
Implement stack using a linked list.
In this interview question, Amazon asked us to create a stack using a linked list.
Example Input:
{"values": [1, 2, 3], "operations": ["push", "push", "push", "pop", "pop", "peek"]}
Example Output:
[3, 2, 1]
Here we push three elements (1, 2, 3) onto the stack. Then we pop twice, which removes 3 and 2 (outputting them). Finally, we peek at the top element, which is 1. The output captures all three results: [3, 2, 1].
We'll solve this question in 5 steps.

Step 1: Create a Node (The Building Block)
Every linked list starts with a node. A node is just a container that holds your data and points to the next node in the chain.
Here's the code:
   class Node:
        def __init__(self, data):
            self.data = data
            self.next = None
What's happening here:
- `self.data` stores the value (like 10, 20, or 30).
- `self.next` points to the next node in the list. When you create a new node, it doesn't know what comes next yet, so next starts as None.
Step 2: Initialize the Stack (Define the Head)
Now that we have nodes, we need a stack to organize them. A stack is just a linked list with one rule: the last item you add is the first one you remove (LIFO).
Here's the code:
    class Stack:
        def __init__(self):
            self.head = None
What's happening here:
- `self.head` represents the top of the stack. When the stack is empty, `head` is `None`.
- Every time you add an item, it becomes the new `head`. Every time you remove an item, you remove the `head` and update it to the next node.
In a linked list, you don't have indexes like a regular list. You can't say "give me item 3." Instead, you start at the head and walk through the chain. The head is your only entry point.
We also need a helper method to check if the stack is empty:
        def is_empty(self):
            return self.head is None
This returns `True` if there's nothing in the stack, `False` otherwise. You'll use this before popping or peeking to avoid errors.
Step 3: Add Core Methods: Push, Pop, Peek
Now we’ll build the three operations that make a stack work: push, pop, and peek.

Push: Add an Item to the Top
This method adds a new element to the top of the stack, making it the new head. Let’s see the code.
        def push(self, data):
            new_node = Node(data)
            new_node.next = self.head
            self.head = new_node
What's happening here:
- Create a new node with the given data.
- Point the new node's `next` to the current `head` (the previous top item).
- Update `head` to the new node. Now it's the top of the stack.
This takes constant time `(O(1))` because you're just updating pointers, not shifting elements like in a Python list.
Pop: Remove and Return the Top Item
This method removes the top element from the stack and returns its value.
        def pop(self):
            if self.is_empty():
                return None
            popped_node = self.head
            self.head = self.head.next
            popped_node.next = None
            return popped_node.data
What's happening here:
- Check if the stack is empty. If yes, return `None`.
- Save the current `head` (the node you're about to remove).
- Move `head` to the next node in line.
- Disconnect the popped node by setting its `next` to `None` (cleanup).
- Return the data from the popped node.
Peek: View the Top Item Without Removing It
This method allows you to look at the top element of the stack without changing it.
       def peek(self):
            if self.is_empty():
                return None
            return self.head.data
What's happening here:
- Check if the stack is empty. If yes, return `None`.
- Return the data from the current `head` without modifying the stack.
All three operations run in `O(1)` time because you're only touching the head, never walking through the entire list.
Step 4: Process Operations
This step automates the execution of multiple operations in sequence. Instead of manually calling push, pop, and peek one by one, we process a list of operations and return the results.
Here's the code:
        def process_operations(self, values, operations):
            output = []
            value_index = 0
            for operation in operations:
                if operation == "push" and value_index < len(values):
                    self.push(values[value_index])
                    value_index += 1
                elif operation == "pop":
                    result = self.pop()
                    if result is not None:
                        output.append(result)
                elif operation == "peek":
                    result = self.peek()
                    if result is not None:
                        output.append(result)
            return output
What's happening here:
- `output` stores the results of pop and peek operations.
- `value_index` tracks which value to push next from the values list.
- Loop through each operation:
- If "push": Push the next value from the list and increment `value_index`.
- If "pop": Remove the top item and add it to `output` (if the stack isn't empty).
- If "peek": View the top item and add it to `output` (if the stack isn't empty).
- Return the `output` list at the end.
Why this matters:
Amazon's question gives you a batch of operations to execute. This method handles all of them in one go and collects the results. Without this, you'd need to track every step manually.
Step 5: Test the Complete Stack Implementation
Now we bring everything together. This is the main function that initializes the stack, processes the operations, and returns the output.
Here's the code:
def create_stack(input_data):
    class Node:
        def __init__(self, data):
            self.data = data
            self.next = None

    class Stack:
        def __init__(self):
            self.head = None

        def is_empty(self):
            return self.head is None

        def push(self, data):
            new_node = Node(data)
            new_node.next = self.head
            self.head = new_node

        def pop(self):
            if self.is_empty():
                return None
            popped_node = self.head
            self.head = self.head.next
            popped_node.next = None
            return popped_node.data

        def peek(self):
            if self.is_empty():
                return None
            return self.head.data

        def process_operations(self, values, operations):
            output = []
            value_index = 0
            for operation in operations:
                if operation == "push" and value_index < len(values):
                    self.push(values[value_index])
                    value_index += 1
                elif operation == "pop":
                    result = self.pop()
                    if result is not None:
                        output.append(result)
                elif operation == "peek":
                    result = self.peek()
                    if result is not None:
                        output.append(result)
            return output

    values = input_data.get('values', [])
    operations = input_data.get('operations', [])

    stack_instance = Stack()
    return stack_instance.process_operations(values, operations)
What's happening here:
- Extract `values` and `operations` from the input dictionary.
- Create a new `Stack` instance.
- Call `process_operations` to execute all operations and return the results.
Test it yourself:
The stack pushes 1, 2, and 3. Then it pops 3 and 2, and peeks at 1. The output captures all three results.
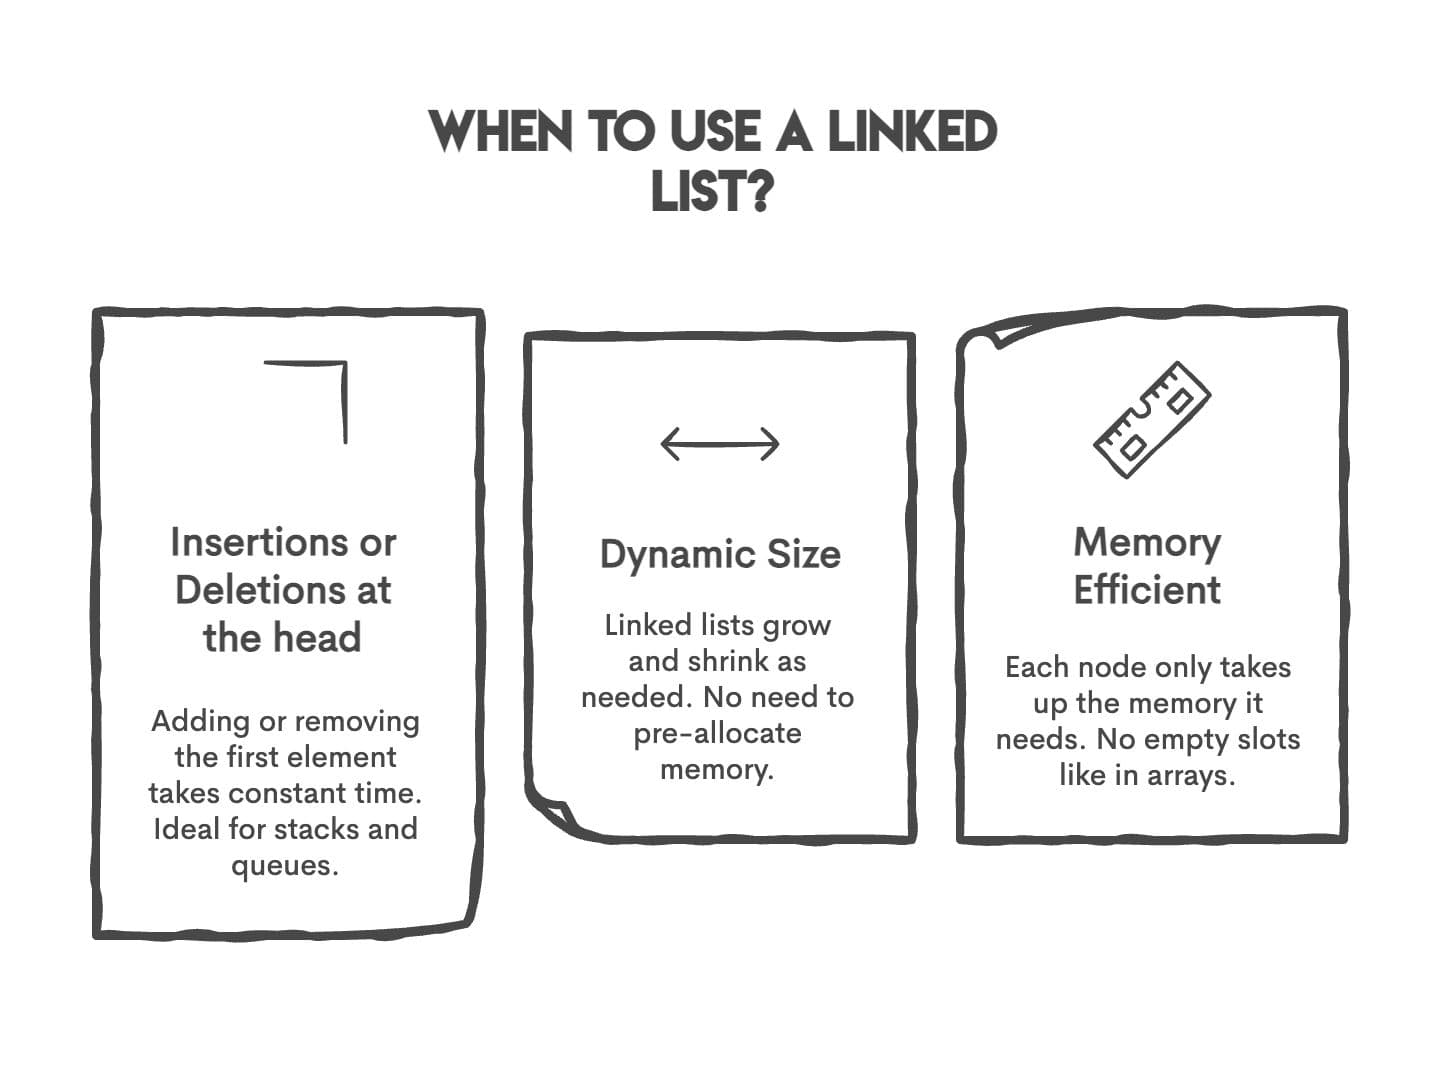
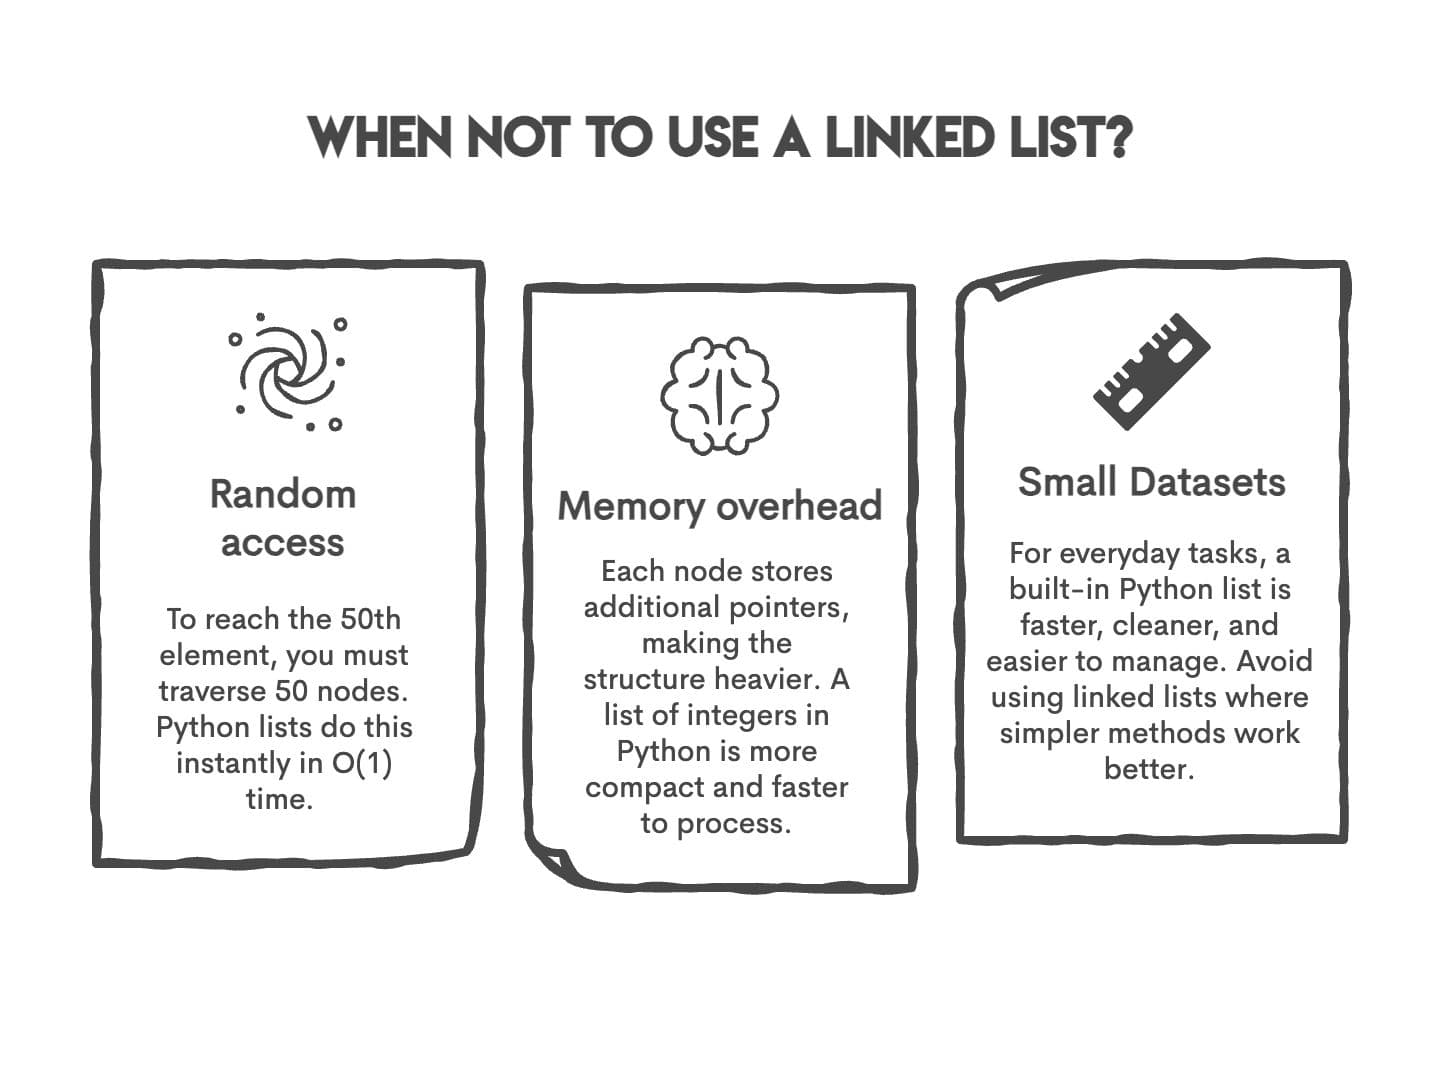
When (and When Not) to Use a Linked List
Let’s check when to use or not use a linked list at first, and we’ll explore the common pitfalls, why they happen, and how to avoid them.
When to Use a Linked List?
You should use a linked list when flexibility and frequent updates matter more than direct access.
When Not to Use a Linked List?
A linked list isn’t the right choice when speed and direct access are critical.
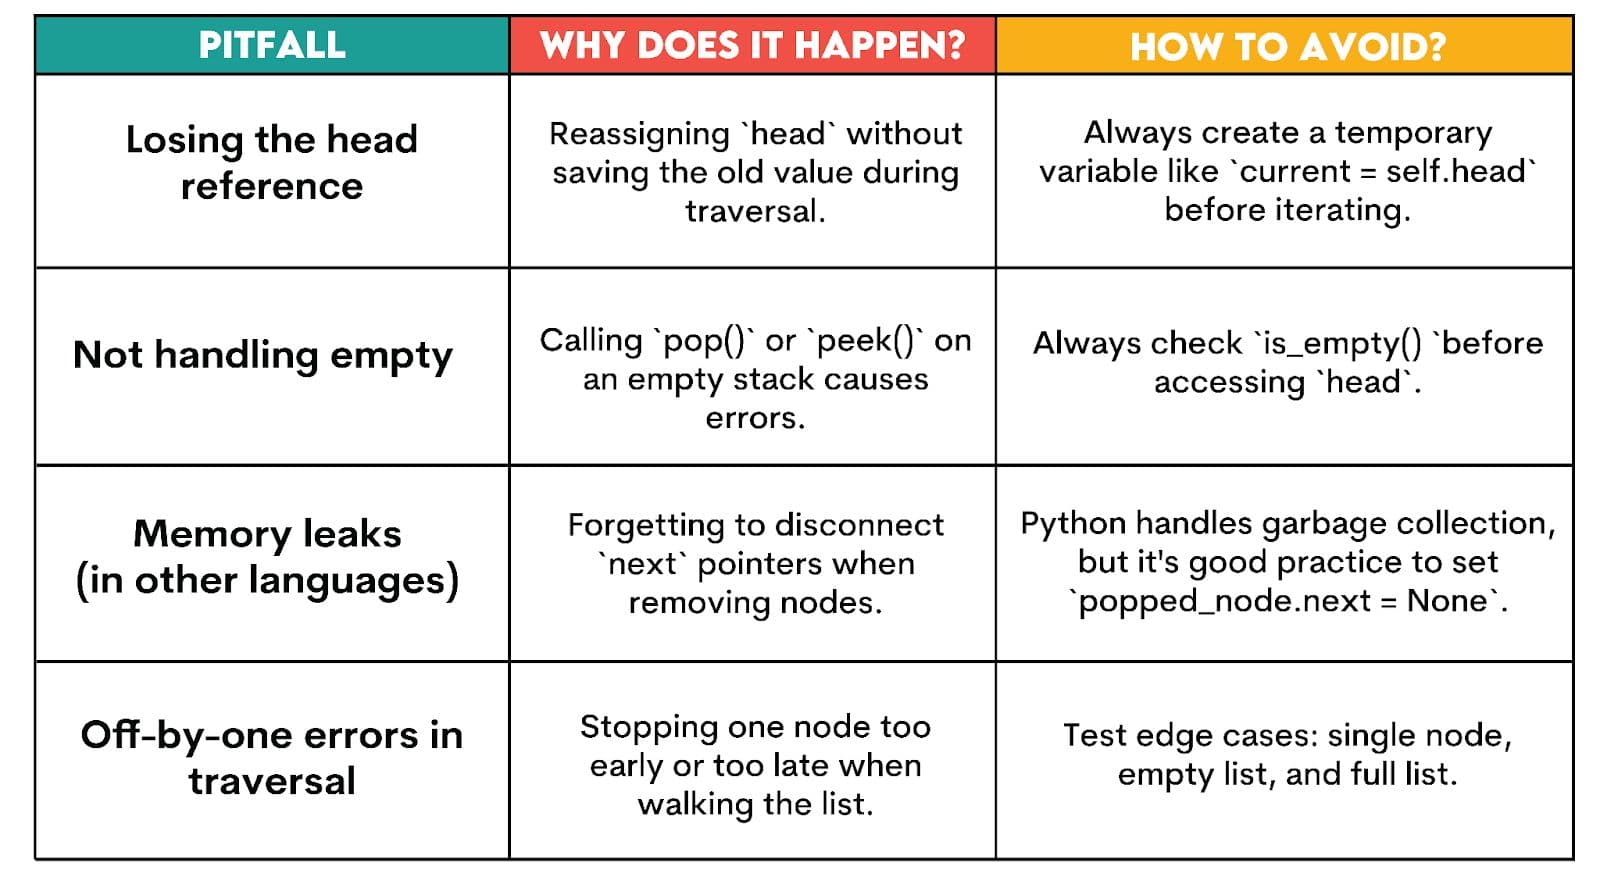
Common Pitfalls and How to Avoid Them
Quick decision guide:
- Need fast insertions at the start? Use a linked list.
- Need fast random access? Use a Python list.
- Need both? Consider a deque from the `collections` module.
Bonus: Doubly and Circular Variants (Compact)
Once you understand singly linked lists, the next step is to explore their two useful variations: doubly linked lists and circular linked lists.
Doubly Linked List:
Each node has two pointers: `next` (forward) and `prev` (backward). This lets you traverse in both directions.
class DoublyNode:
    def __init__(self, data):
        self.data = data
        self.next = None
        self.prev = None
When to use it:
- You need to move backward through the list (like browser history: back and forward buttons).
- Deleting a node in the middle is easier because you have access to both neighbors.
Trade-off: Extra memory for the `prev` pointer. Each node is slightly larger.
Circular Linked List: The last node points back to the first node instead of `None`. The list forms a loop.
last_node.next = self.head
When to use it:
- Round-robin scheduling (like distributing tasks evenly across workers).
- Continuous loops (like a playlist that repeats).
Trade-off: You must track where the loop starts to avoid infinite traversal. Always set a stopping condition.
Which one should you learn first? Stick with singly linked lists for interviews. Doubly and circular variants are niche. Master the basics, then explore these only if your use case demands them.
Interview Corner: Practice Problems to Sharpen Your Skills
If you want to challenge yourself with more linked list interview problems, here are a few from the StrataScratch platform that test different aspects of your understanding:
1. Goldman Sachs Interview Question
Remove duplicate values from an unordered singly linked list while keeping only the first occurrence. Perform this in a single traversal using a set for tracking.
2. Goldman Sachs Interview Question
Create a linked list from an input list, delete the first and second nodes, and return the remaining elements.
3. Deloitte Interview Question
Implement a deque (double-ended queue) using a linked list structure.
4. Goldman Sachs Interview Question
Detect if a single-linked list contains a loop and handle it efficiently.
Conclusion
Building a stack as a linked list showed us something: How data structures make speed compromises in the interest of flexibility.
Now you have the skill of creating a linked list from scratch. And you know how it actually works. Next time you face a stack or queue problem, ask yourself:
- Do I need random access?
- Or do I need fast insertions?
FAQs
Does Python have a built-in linked list?
Python doesn’t have a built-in linked list, but you can easily code one yourself.
Linked list vs Python list: What’s faster?
Python lists are faster for most tasks, while linked lists shine at quick insertions or deletions.
How to print a linked list in Python?
You print a linked list by looping through its nodes until you hit None.
Are linked lists good for queues and stacks in Python?
Linked lists work great for stacks and queues because they handle push and pop efficiently.
Singly vs doubly vs circular: when to choose which?
Use singly for simplicity, doubly for two-way traversal, and circular for continuous loops.
Share