Exploring NumPy where() in Python for Conditional Operations

Categories:
 Written by:
Nathan Rosidi
Master NumPy where() for smarter data filtering, conditional replacements, and interview-ready logic with clean, efficient Python code.
How would you filter or identify specific values in a large dataset using smart logic? In Python, several techniques exist for this purpose, but NumPy's implementation stands out for its speed and versatility.
In this article, we will analyze np.where() from basic conditions to real-world interview scenarios and compare it with alternative methods.
What is NumPy where() and When Should You Use It?
np.where() is a function in NumPy that returns elements based on a specified parameter, which is similar to asking, “Where does this happen?"
The fundamental syntax of NumPy where appears as follows:
numpy.where(condition, [x, y])
At its core, it checks the condition. If the condition is true, it selects values from x. If it's not, it selects values from y. But you can also use it with just one input to find the indices where the criteria are met.
So, when should you use it? Here are several use cases:
- With just one argument: when you need the indices of items that meet a specific condition.
- With three arguments: when you need to change values based on certain factors
- When cleaning data, engineering features, making conditional replacements, or masking processes on large arrays
Using NumPy where() with One Argument: Finding Indices
Let's start with something simple.
When you offer np.where() a condition, it gives you the indices where that condition is true. That's incredibly handy when you need to identify data points but don't want to edit or touch the collection.
What does this code do?
We'll create a NumPy array with some numbers in it and then use np.where() to identify the numbers greater than 10. This is the code.
import numpy as np

arr = np.array([5, 12, 7, 18, 3, 14])
indices = np.where(arr > 10)

print(indices)
print(arr[indices])
Here is the output.

Let’s see what happened:
np.where(arr > 10)gave us the indices[1, 3, 5]. The values that exceed 10 are found in those locations.- With those indices,
arr[indices]pulled out[12, 18, 14].
Using NumPy where() with Three Arguments: Conditional Selection
By passing NumPy three arguments, you are telling it to use this value if the condition is true and that value otherwise. It suggests an alternative to the if-else statement.
What does this code do?
As before, we'll use the same array. This time, values will be changed:
- If a number surpasses 10, keep it.
- Otherwise, replace it with 0.
Here is the code.
import numpy as np

arr = np.array([5, 12, 7, 18, 3, 14])
new_arr = np.where(arr > 10, arr, 0)

print(new_arr)
Here is the output.

Here is what just happened:
Arr > 10was the condition at the time.- If it were true, we kept the first value
- If it's false, we replace
0.
Applying NumPy where() to Multi-dimensional Arrays
Your data can reside in higher-dimensional arrays or matrices, such as image data. In these cases, np.where() still works well; it just applies the condition to each element in every dimension.
What does this code do?
Using a 2D array, we will name those values below 50 as "Low" and those 50 or higher as "High", just like when we label scores. Here is the code.
import numpy as np

scores = np.array([[45, 82, 60],
                   [30, 55, 90]])

labels = np.where(scores < 50, 'Low', 'High')

print(labels)
Here is the output.

Here is what just happened:
- Every number is examined: Is it less than fifty?
- 'Low' is the term used if it is.
- It becomes 'High' otherwise.
A loop wasn't necessary. You didn’t require if-else checks. Only a single line.
Chaining and Combining Conditions
Sometimes, you might need more than one condition. In this case, chaining and combining conditions with np.where() would be a good choice.
Logical operators like & (and), | (or), and ~ (not) with parentheses can let you make your own logic.
What does this code do?
We'll use scores to expand on our previous example.
- Mark a score as "Medium" if it falls between 50 and 80.
- 'High' if 80 or higher
- Otherwise, 'Low'
Let’s see the code.
import numpy as np

scores = np.array([[45, 82, 60],
                   [30, 55, 90]])

labels = np.where(scores >= 80, 'High',
         np.where((scores >= 50) & (scores < 80), 'Medium', 'Low'))

print(labels)
Here is the output.

Here is what just happened:
- First, we check if a score is 80 or more → 'High'
- If not, we go to the np.where()
- There, we check if it’s between 50 and 80 → 'Medium'
- Else → 'Low'
Scaling conditions are made simple through logical combinations and nested calls.
Interview Question From Meta - User Streaks
User Streaks
Last Updated: October 2022
Provided a table with user ID and the dates they visited the platform, find the top 3 users with the longest continuous streak of visiting the platform up to August 10, 2022. Output the user ID and the length of the streak.
In case of a tie, display all users with the top three longest streak lengths.
In this question, Meta asked candidates to find the top 3 users with the longest continuous streak of visiting the platform as of August 10, 2022.
Let’s break down how to solve this question.
What does this code do?
To find streaks, the code examines user visit records. First, it removes duplicates, sorts by user and date, and filters by a cutoff date. It then computes the previous visit for each record and marks whether the current visit starts a new streak or continues the previous one.
A new streak starts if two visits are not on consecutive days. Otherwise, they are part of the same streak.
Each user’s streak lengths are calculated, and only their longest streak is kept. The distinct longest streak lengths are then ranked, and the top three unique lengths, allowing for ties, are selected. The users whose longest streak matches these top lengths are returned. Here is the code.
import numpy as np
import pandas as pd

# Remove duplicates, keep only dates up to cutoff
unique_visits = user_streaks.drop_duplicates().sort_values(by=['user_id','date_visited'])
unique_visits = unique_visits[unique_visits['date_visited'] <= '2022-08-10']

# Compute lagged previous date
unique_visits['prev_visit'] = unique_visits.groupby('user_id')['date_visited'].shift(1)

# Mark start of a new streak
unique_visits['streak_marker'] = np.where(
    (unique_visits['date_visited'] - unique_visits['prev_visit']).dt.days == 1,
    0,
    1
)

# Compute streak IDs
unique_visits['streak_id'] = unique_visits.groupby('user_id')['streak_marker'].cumsum()

# Compute streak lengths
streaks_per_user = unique_visits.groupby(['user_id', 'streak_id']) \
    .size().reset_index(name='streak_length')

# For each user, keep only their longest streak length
longest_per_user = streaks_per_user.groupby('user_id', as_index=False)['streak_length'].max()

# Rank distinct streak lengths
distinct_lengths = longest_per_user['streak_length'].drop_duplicates().sort_values(ascending=False)
distinct_lengths = distinct_lengths.reset_index(drop=True)
distinct_lengths.name = 'streak_length'
distinct_lengths = pd.DataFrame(distinct_lengths)
distinct_lengths['len_rank'] = distinct_lengths['streak_length'].rank(
    method='dense',
    ascending=False
)

# Keep top 3 streak lengths
top_lengths = distinct_lengths.loc[distinct_lengths['len_rank'] <= 3, 'streak_length']

# Return users whose longest streak matches a top length
result = longest_per_user[longest_per_user['streak_length'].isin(top_lengths)]
result = result.sort_values(['streak_length','user_id'], ascending=[False, True])
- The dataset has already been loaded as a pandas.DataFrame.
- print() functions and the last line of code will be displayed in the output.
- In order for your solution to be accepted, your solution should be located on the last line of the editor and match the expected output data type listed in the question.
This output tells us that:
- Users u004 and u005 both achieved the highest streak of 10 consecutive days.User u003 had a streak of 5, while u001 and u006 followed with 4.
- The use of
np.where()here marks the start of a new streak. Every time two dates are not one day apart, we start fresh. - From there,
groupbyandcumsum()helped us segment each user’s visit history into streaks.
This is a real showcase of how NumPy and Pandas work together for time-series behavioral analysis.
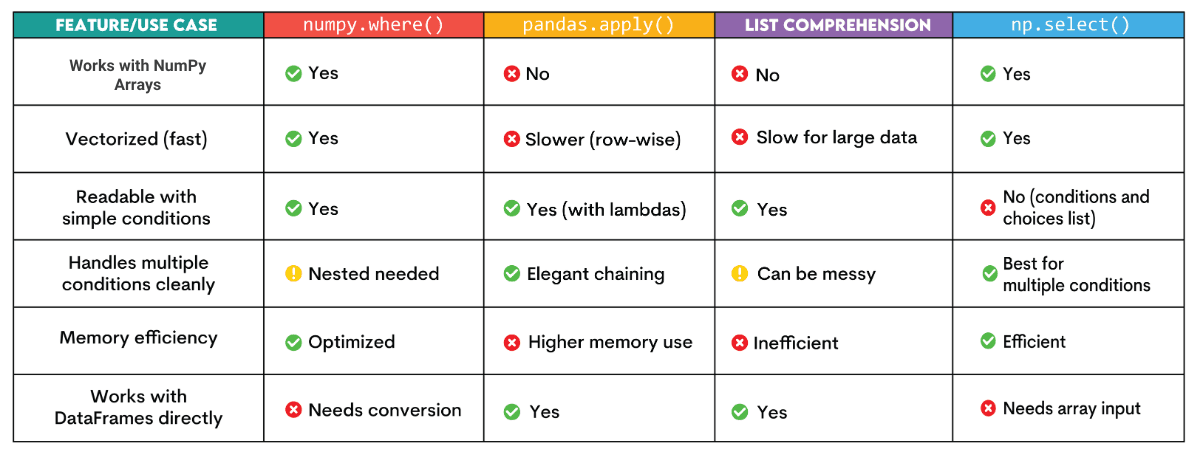
Difference Between NumPy where() and Other Alternatives
Other conditional logic tools are available in Python, particularly when working with Pandas or even just pure lists.
For more practical examples on applying NumPy functions in technical interviews, check out our guide on NumPy for Data Science.
Let's examine some well-liked substitutes for np.where() and compare them with it:
Final Thoughts
In this article, we explored numpy.where() through simple examples, multi-dimensional use cases, and real interview-level questions.
Although it's quick, easy to read, and great for data-focused tasks, using it directly on DataFrames or nesting too many conditions can make it challenging.
Share