Best Practices for R Continuous Integration

 Written by:
Nathan Rosidi
Implementing Continuous Integration in R: Automate Tests, Detect Errors Early, and Keep Your Analysis Consistent
You wouldn't ship an app without testing. So why skip it for your R scripts?
Continuous integration runs checks every time you update your code. It catches bugs early and keeps your analysis solid. For example, it can test your data preprocessing before retraining a model.
In this post, I’ll show you how to set up CI for R. You’ll see tools, workflows, and best practices that work.
What is R Continuous Integration?
Continuous integration (CI) means testing your code every time you make a change. It happens automatically, often when you push to GitHub.
In R projects, this could mean checking if your scripts still run. Or if your model training code fails after a new update.
CI tools give fast feedback. You know right away when something breaks.
This helps in data science, where many things can silently fail, such as a missing column or a new NA value in your dataset.
CI ensures your work remains reliable. Even when projects become large or teams expand.
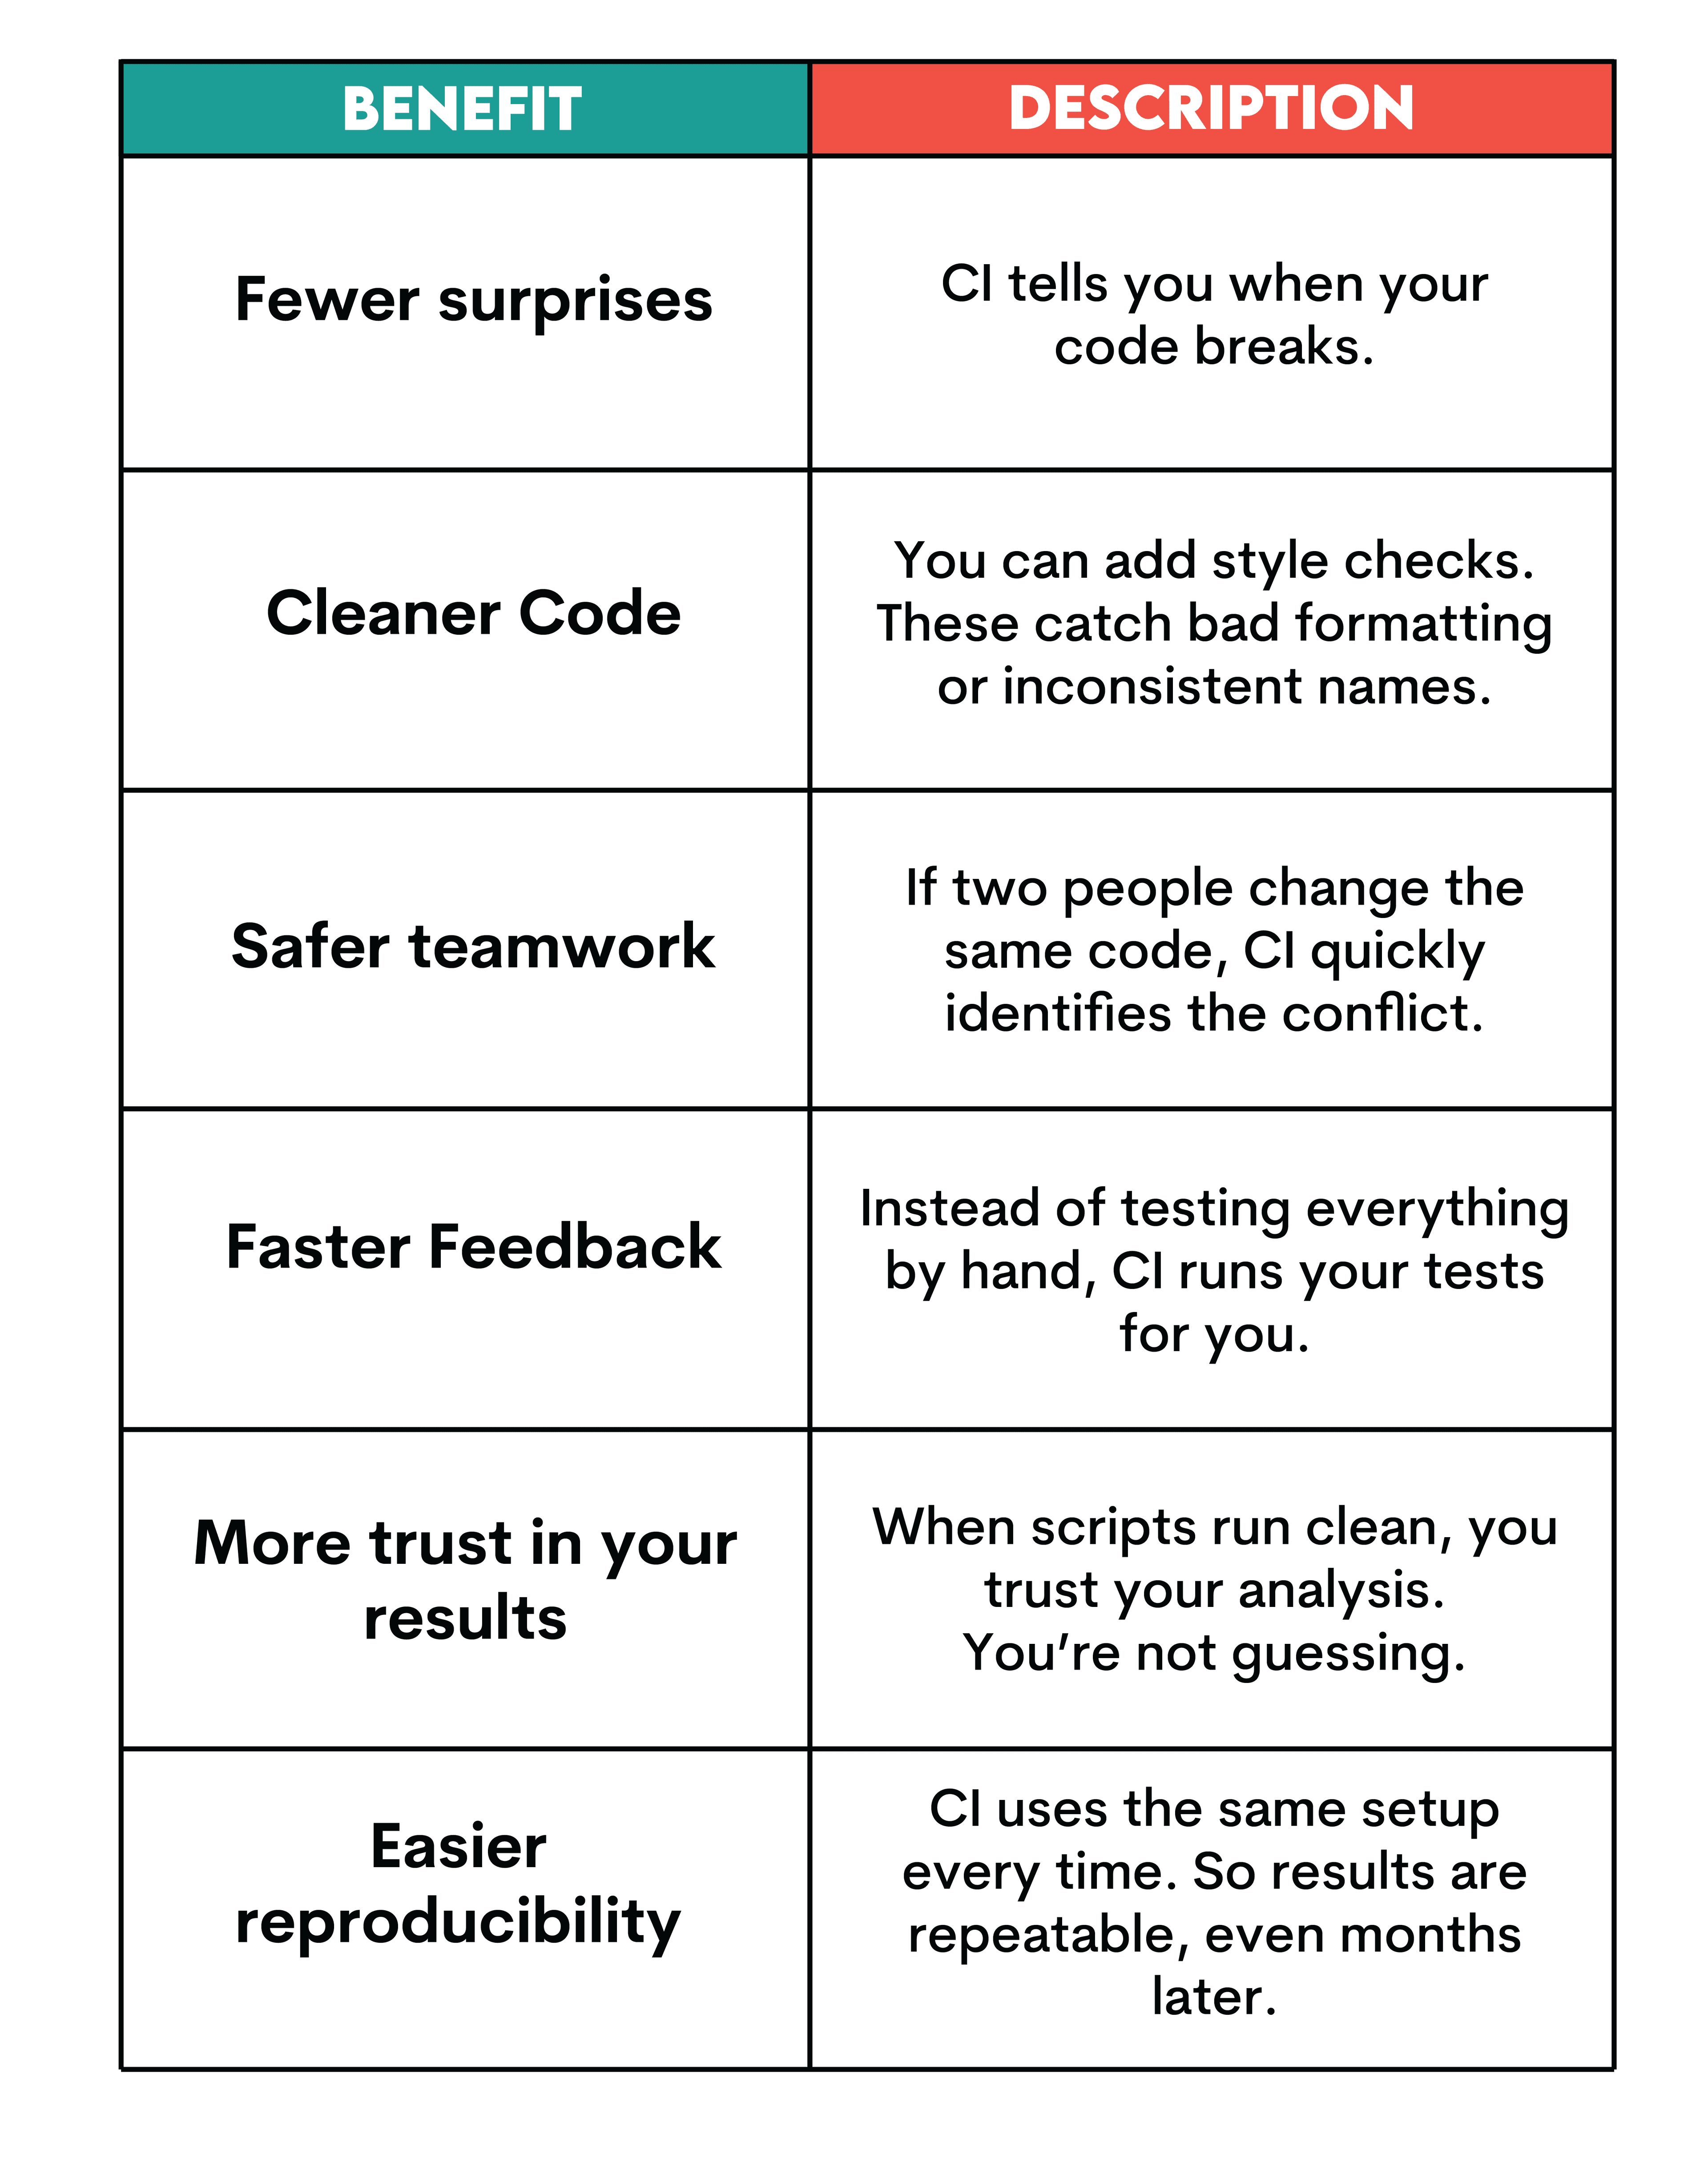
Benefits of Continuous Integration in R
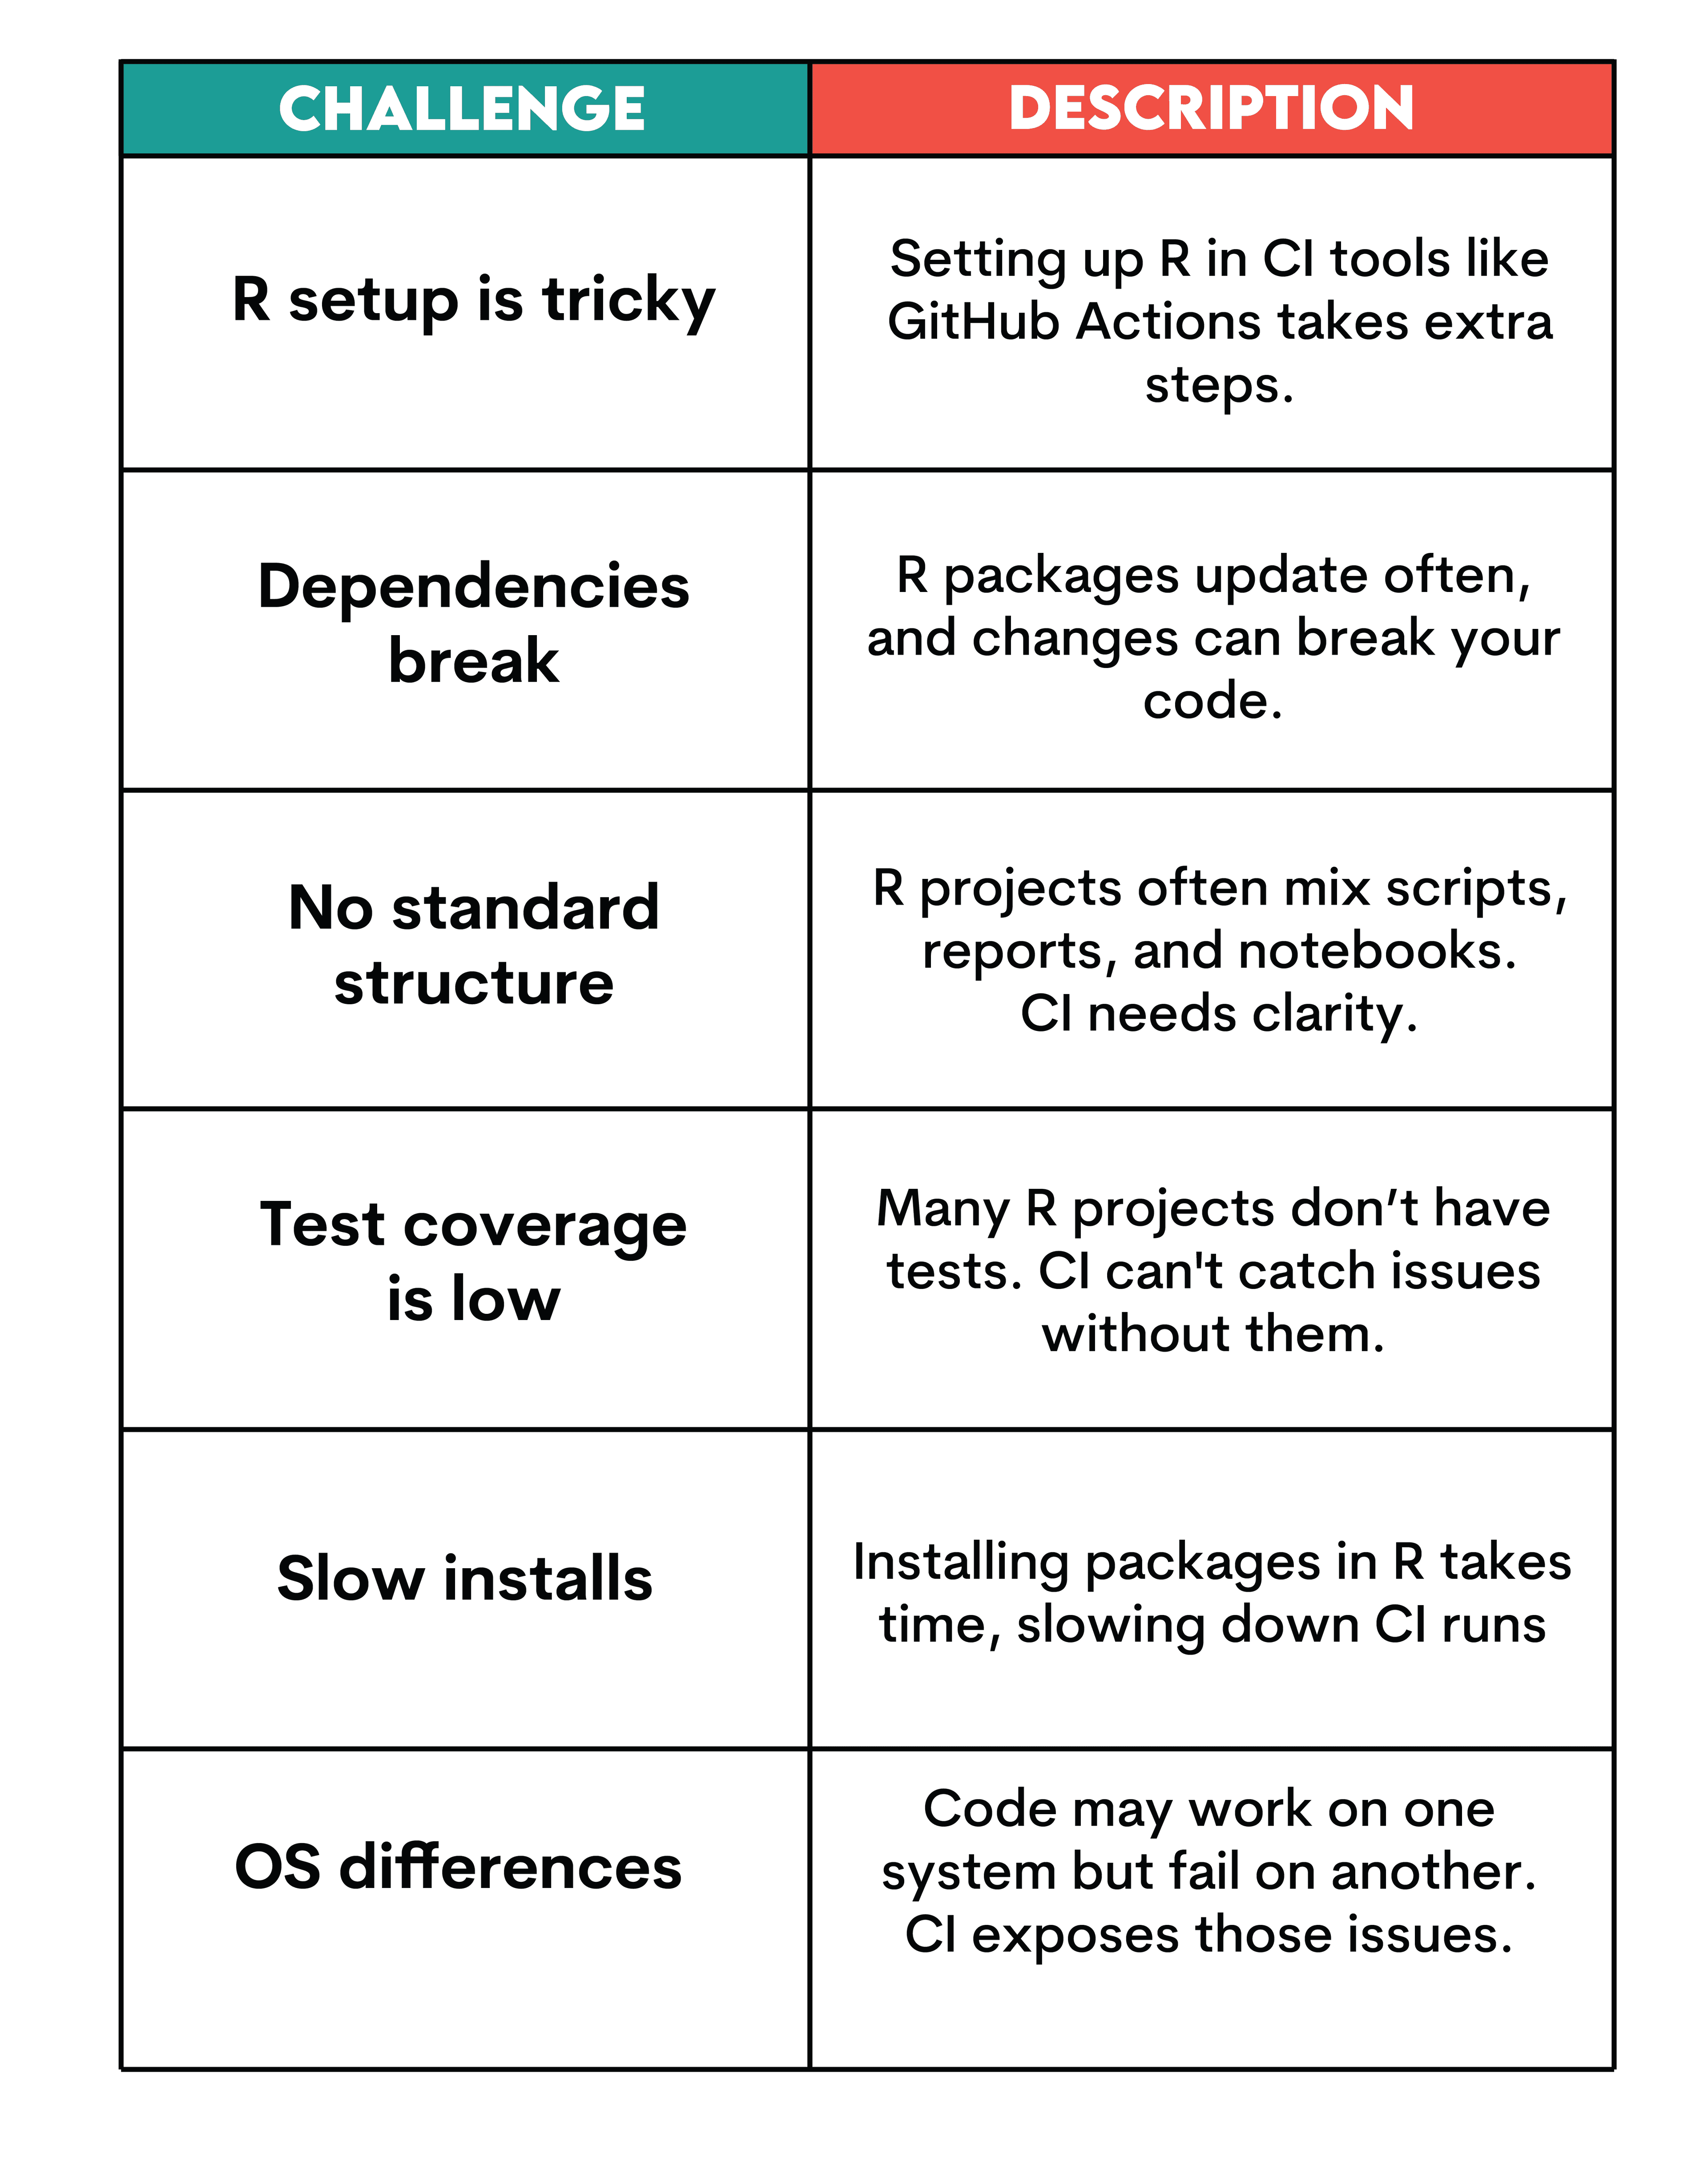
Key Challenges in R Continuous Integration
Choosing the Right Tools for R Continuous Integration
There are several platforms that support CI for R.
GitHub Actions
We will also use GitHub Actions later in this article.
- It works directly inside GitHub.
- The r-lib/actions/setup-r action sets up R.
- It runs tests, checks the package, and lints code.
Why do we use it?
- Free for public repositories
- Easy to set up
- Actively maintained by the R community
Docker
Docker helps define a consistent R environment.
- We can test the same environment locally and remotely.
- It's useful if the project has system-level dependencies.
Less common tools
- Travis CI: Still used, but less common.
- CircleCI / GitLab CI: Flexible but more complex.
- Jenkins: Powerful, mostly used in large teams.
- AppVeyor: For Windows testing.
Summary
For most R projects, GitHub Actions is enough. It's simple, stable, and supported by the R ecosystem.
Example CI Workflow for an R Project with GitHub Actions
Let's say you have a machine learning project in R, where a team of three people collaborates on the same repository. They all edit the same model training script. Each time someone pushes a change, your manager wants to make sure:
- The model object is created successfully
- Predictions are numeric and binary (only 0 or 1)
- The script doesn't silently fail due to bad data or broken code
To manage this, you decide to add tests and CI.
Understanding the R Project Structure for CI
Here’s a simplified structure of your repo:
r-ci/
├── R/
│   └── train_model.R
├── tests/
│   └── testthat/
│       └── test_model.R
├── .github/
│   └── workflows/
│       └── r-ci.yaml
└── r-ci.Rproj
Let’s check how each file works in our project:
- R/train_model.R: Core script that trains the model.
- tests/testthat/test_model.R: Contains tests for model output.
- .github/workflows/r-ci.yaml: Defines CI steps for GitHub.
- r-ci.Rproj : RStudio project file for development.
We’ll update the model code, push it to GitHub, and watch CI validate the changes automatically.
Writing and Running Automated Tests in R
You’ve already written tests to make sure your model predictions are numeric and binary, and the model object is valid. You could run these checks manually every time, but that’s error-prone and easy to forget.
A better way is to automate this with CI.
That’s where we use GitHub Actions. It runs your tests automatically every time you push to GitHub. These tests are written using the testthat package, a popular unit testing framework in R. GitHub Actions installs this package and uses it to run your test scripts inside tests/testthat/test_model.R.
Here’s what those tests might look like:
test_that("All predictions are numeric and binary", {
  expect_true(is.numeric(output$predictions))
  expect_true(all(output$predicted_class %in% c(0, 1)))
})

test_that("Model object exists", {
  expect_s3_class(output$model, "glm")
})
This way:
- GitHub Actions knows where to find your tests
- The testthat package can run them properly
- Your CI workflow (r-ci.yaml) knows what to execute
So, once you've written your tests and pushed the code, CI automatically runs them on every commit or pull request.
Now, every time someone pushes to the repo, CI runs these tests for you automatically.
No one needs to remember the rule. No one needs to manually run checks. If something breaks, CI fails the build.
The CI Workflow File
Now that you’ve got tests in place, you need to tell GitHub Actions how to run them.
To do that, you write a workflow configuration file.
- Filename: r-ci.yaml
- Location: .github/workflows/
Here is the code.
name: R-CI

on:
  push:
    branches: [main]
  pull_request:
    branches: [main]

jobs:
  check:
    runs-on: ubuntu-latest

    steps:
      - name: Checkout code
        uses: actions/checkout@v3

      - name: Set up R
        uses: r-lib/actions/setup-r@v2

      - name: Install dependencies
        run: |
          Rscript -e 'install.packages("remotes")'
          Rscript -e 'remotes::install_deps(dependencies = TRUE)'

      - name: Run tests
        run: |
          Rscript -e 'install.packages("testthat")'
          Rscript -e 'testthat::test_dir("tests/testthat")'

      - name: Lint code
        run: |
          Rscript -e 'install.packages("lintr")'
          Rscript -e 'lintr::lint_dir()'
Whenever someone pushes to main branch (or opens a pull request), GitHub Actions will:
- Set up an R environment
- Install your dependencies
- Run your testthat tests (
tests/testthat/test_model.R) - Lint the code for style issues
That’s the glue between your repo and continuous integration. From here, every commit gets checked automatically.
Testing and Debugging Your CI Pipeline
To test the workflow, we’ll start with a dataset that looks simple enough.
- Filename: train_model.R
- Location: R/train_model.R
# R/train_model.R

student_data <- data.frame(
  age = c(21, 22, 23, 24, NA),
  gender = c("M", "F", "F", "M", "F"),
  score = c(85, 90, 78, 88, 92),
  passed = c(1, 1, 0, 1, 1)
)

student_data <- na.omit(student_data)

predictor_vars <- c("age", "score")
if (!all(sapply(student_data[, predictor_vars], is.numeric))) {
  stop("All predictor variables must be numeric.")
}
At first glance, nothing looks wrong. But notice the dataset:
- age has an NA
- gender is categorical
When we run this through our tests in GitHub Actions, the pipeline fails with an error.
Create a Repository
Now, if you don’t have a GitHub repository, you will need one to upload all these files, as we will use GitHub Actions to test. Read this one to learn how to create a GitHub repository.
Pushing to GitHub
Now, let’s send the changes you made to GitHub. To do that, you can use the following commands.
git add . && git commit -m "CI" && git pushGitHub Actions
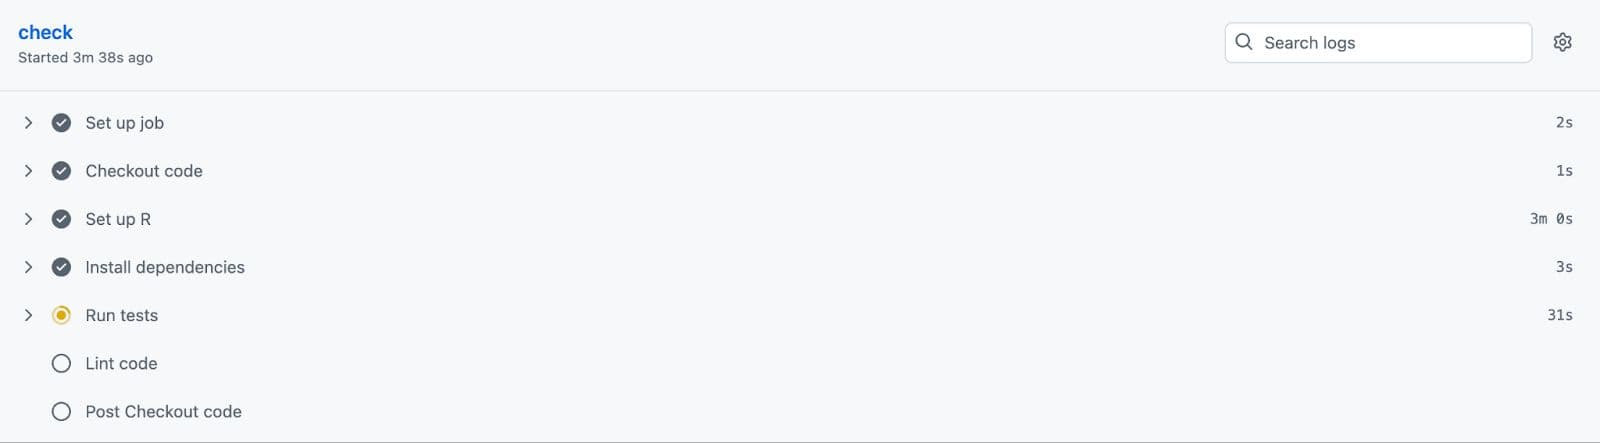
After sending the changes, go ahead to the “Github Actions” on your repository.

You can also click on it to see the progress.
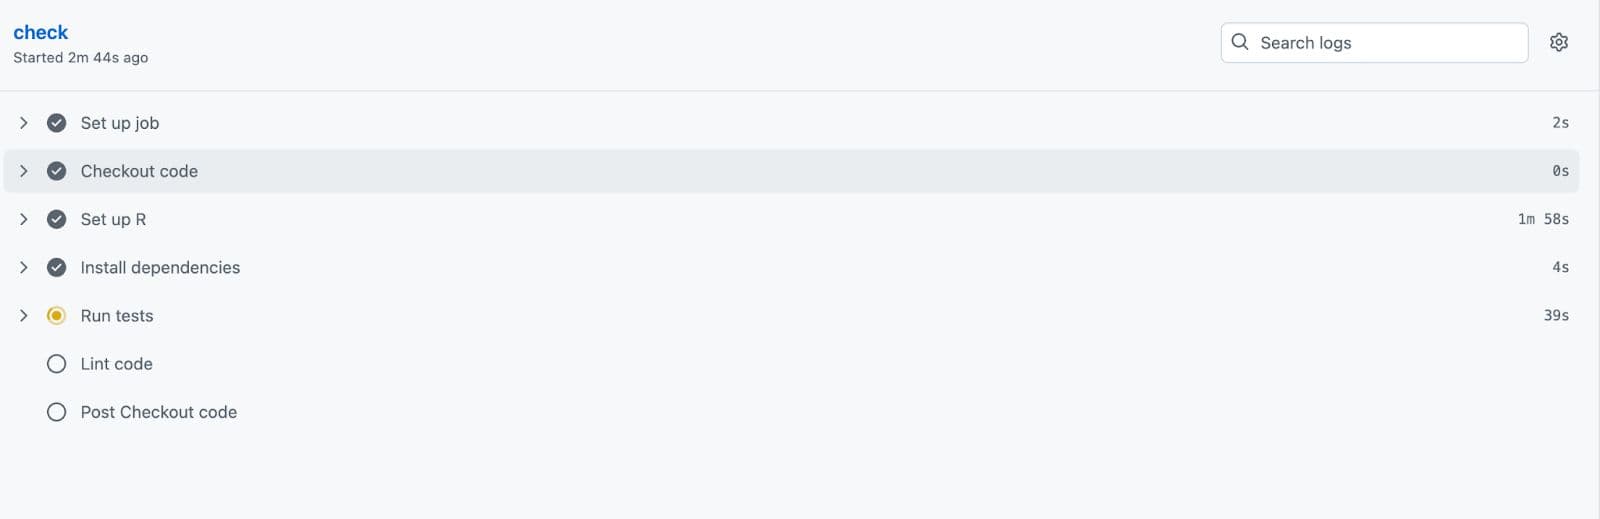
You can also click on it to see the progress.
Here, it ran tests we’ve defined, but we’ve got an error:
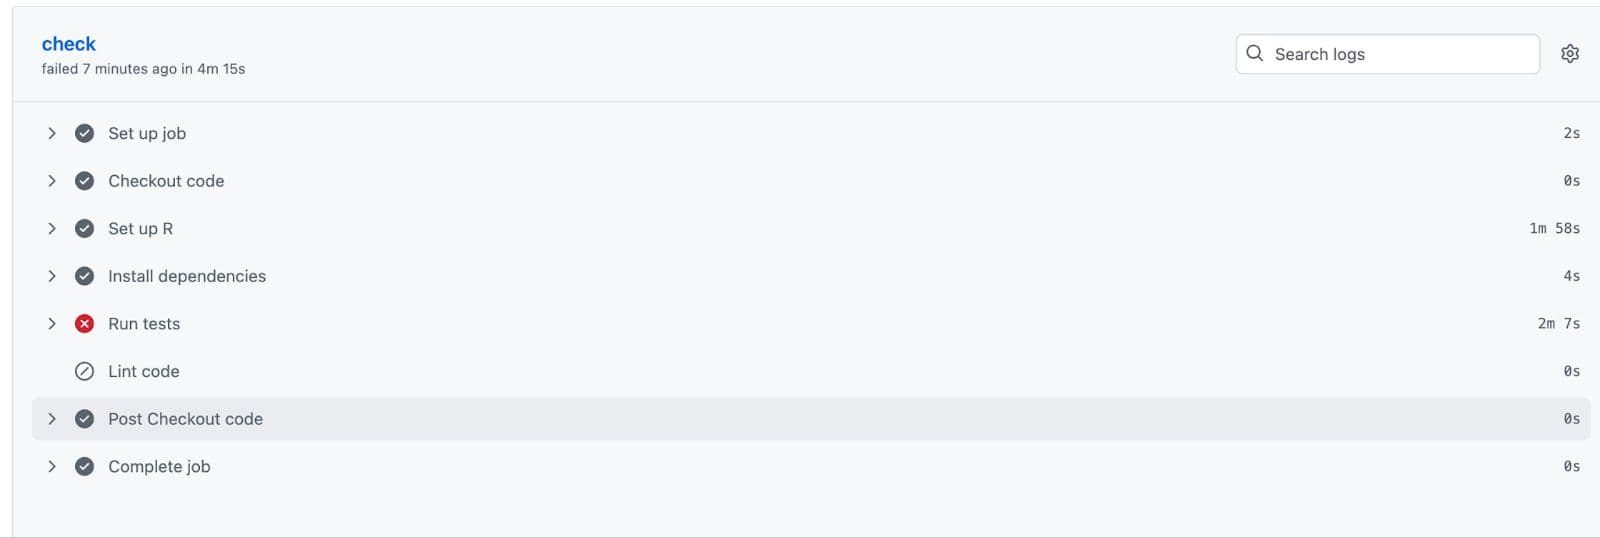
If we click on “Run tests”, it directs us to the location where the error occurs. Please check.
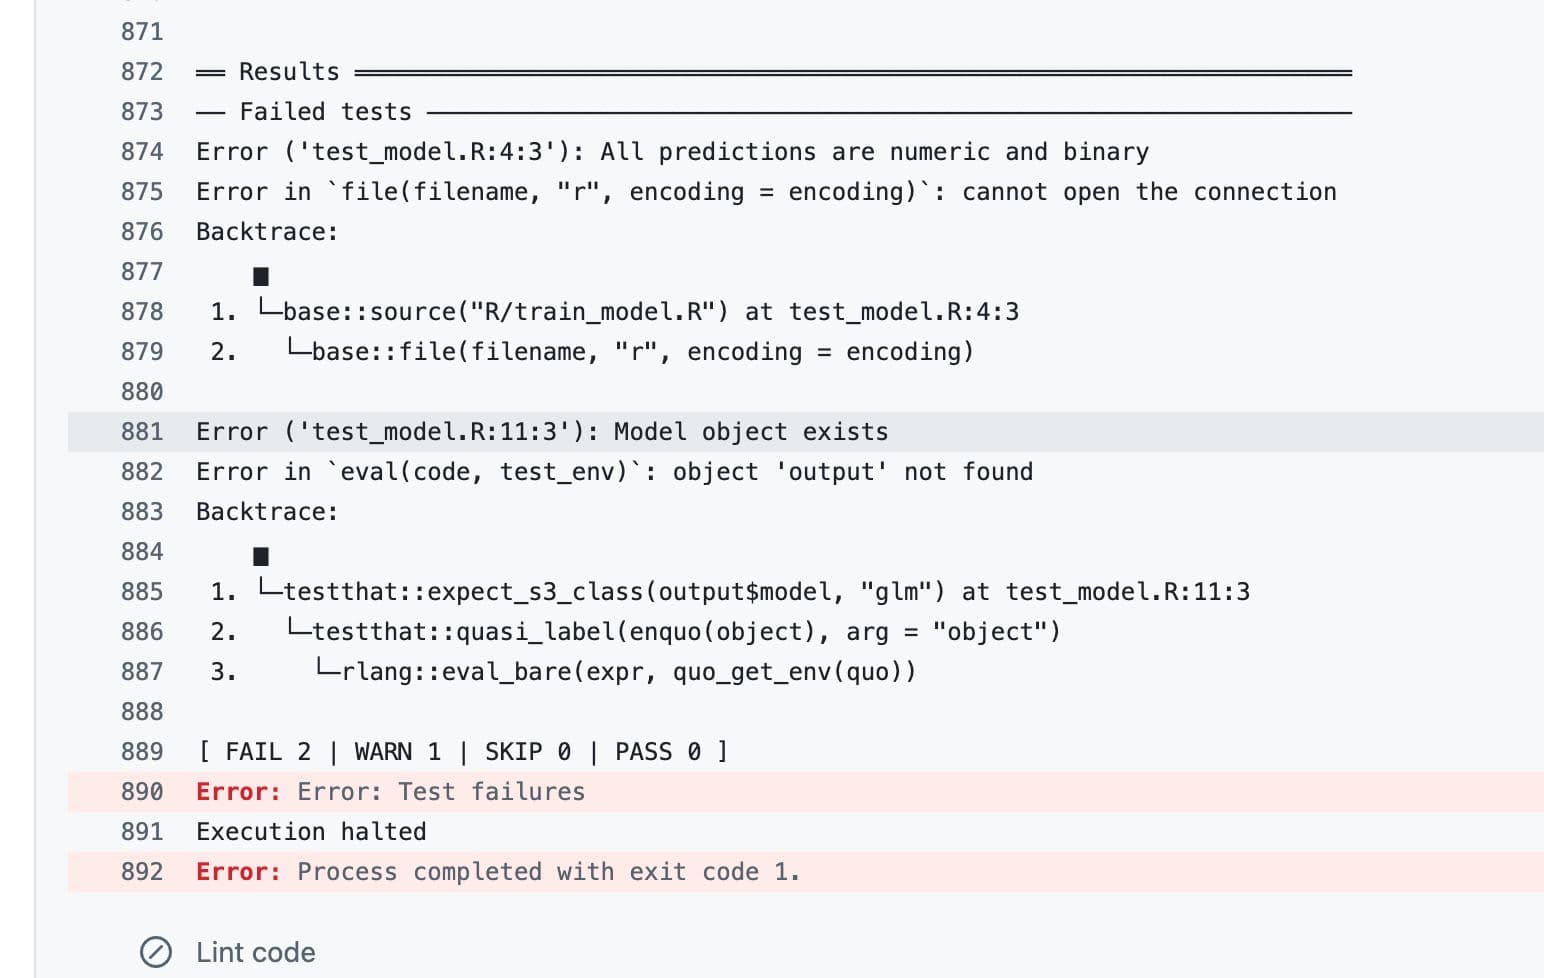
As you can see, the error happens because “All predictions should be numeric”. Now let’s update our code and send it one more time.
Correction
We removed the missing value and excluded the non-numeric gender variable from the model to ensure all predictors are numeric. Here is the latest version of train_model.R.
# R/train_model.R

student_data <- data.frame(
  age = c(21, 22, 23, 24, 25),
  gender = c("M", "F", "F", "M", "F"),   # kept, but not used in the model
  score = c(85, 90, 78, 88, 92),
  passed = c(1, 1, 0, 1, 1)
)

student_data <- na.omit(student_data)

predictor_vars <- c("age", "score")

if (!all(sapply(student_data[, predictor_vars], is.numeric))) {
  stop("All predictor variables must be numeric.")
}

model <- glm(passed ~ age + score, data = student_data, family = binomial)

predictions <- predict(model, type = "response")
predicted_class <- ifelse(predictions > 0.5, 1, 0)

output <- list(
  model = model,
  predictions = predictions,
  predicted_class = predicted_class,
  student_data = student_data
)

saveRDS(output, file = "model_output.rds")
Pushing to GitHub After Correction
And send all updated files to GitHub once again with the following commands.
git add . && git commit -m "correction" && git push
Next, visit your GitHub repository and click on the “Actions”. Here, you’ll see the new changes.

Here, we see the tests are now running.
And voila! All tests have passed.
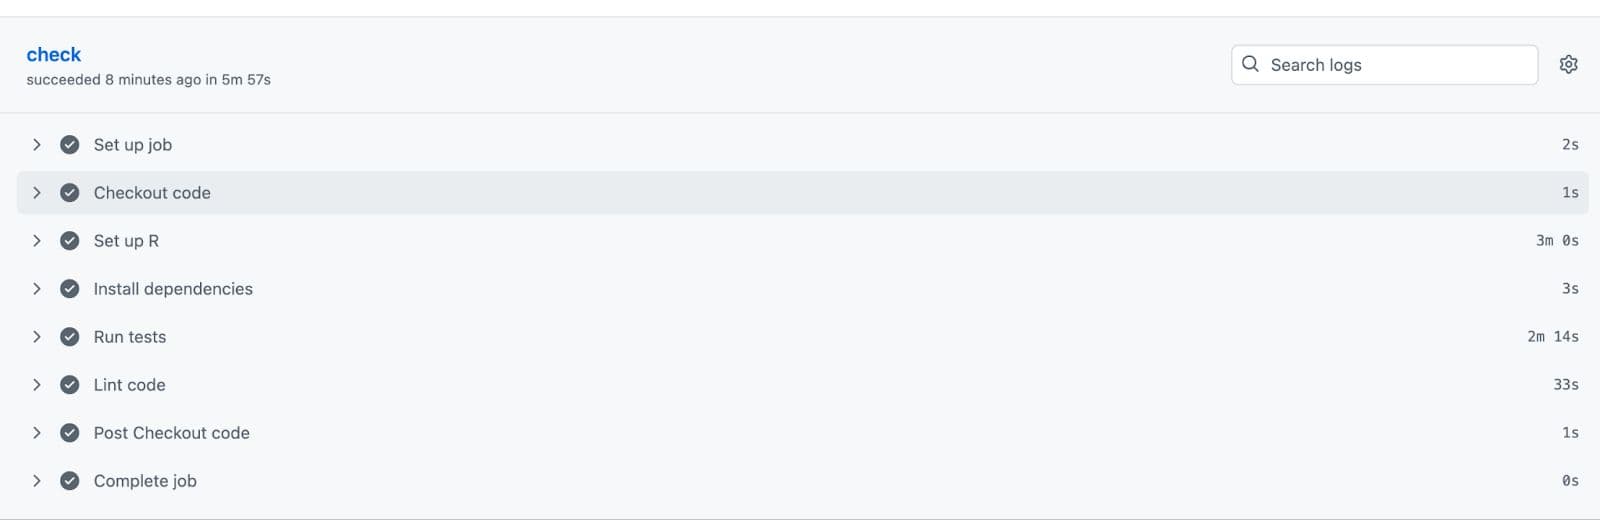
Now your code has been successfully uploaded to GitHub because it has passed the tests!
Conclusion
Continuous Integration isn't just for big teams or packages; it fits everyday R workflows too.
By writing a few simple tests and connecting them to GitHub Actions, you’ve added an automated safety net to your project. Every push now triggers a full check of your model, ensuring your code runs, your output makes sense, and bugs don’t silently slip in.
Share